Are you a complete beginner in calisthenics? Check this calisthenics workout for beginners and make progress at your own pace with FitnessFAQs.
In this article, we’ll cover everything you need to know to get started in calisthenics. You’ll get a TRUE beginner calisthenics program that will build a solid foundation of strength and mobility to master the basics.
Table of Content
- Definition of basic calisthenics terms
- Beginner Calisthenics program
- Training Protocols
- Level 1
- Level 2
- Level 3
Definition of Calisthenics Terms
Repetitions (reps) – This refers to the number of times you perform one movement. For example, one full execution of a push-up is one repetition.
Sets – Sets refer to the total amount of repetitions. For example, after performing ten reps of a push-up, then you’ve accumulated one set.
Eccentrics (Negatives) – Also known as negatives, the eccentric phase is when your muscles lengthen. Research shows that our muscles can produce more force than when performing the concentric or “positive” phase of an exercise. While performing eccentrics, our muscles also get stronger in the concentric position as well. Beginners can take advantage of this while working towards the full range of motion of an exercise.
Range of motion (ROM) – You’ll often encounter this term in calisthenics. This refers to the range of movement patterns your body executes. A full range of motion per exercise varies. However, performing a full ROM to maximize strength and muscular development in calisthenics is often ideal.
Rest Periods – Rest periods between sets are crucial for achieving the ideal volume for specific goals. Respecting the rest periods allows your body to recover so you can get the most from your workout.
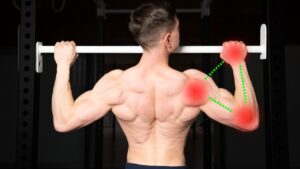
Scapula – The scapula refers to the muscles controlling your shoulder blades. In calisthenics, scapula control maximizes force production in each rep while keeping your shoulders healthy and safe from injuries.
Scapula Positioning
There are six movement patterns we need to be aware of. We need to know these movements since we will perform them in upper-body calisthenics exercises.
- Depression – Pushing your shoulders down away from your ears, which is performed during pull-ups, push-ups, and dips.
- Elevation – This is the opposite of depression that pulls the shoulders towards your ears, which is performed during handstands and other overhead movements.
- Retraction – Performed by pinching your shoulder blades together, which is done in pull-ups, rows, and dips.
- Protraction – Done by pushing your shoulder blades apart. Protraction stabilizes the shoulders in exercises such as the back lever and planche.
- Upward rotation – This motion refers to the upward movement of the scapula, which is commonly seen in the overhead arm position, such as a handstand.
- Downward rotation – This is the downward and backward movement of the arms, which is seen in a back lever.
By knowing these concepts, we can better understand how to get started efficiently and safely as a beginner in calisthenics.
Who Uses This Beginner Calisthenics Workout
This workout is designed to build general upper body strength in both pushing and pulling using the calisthenics basics.
Complete beginners up to those trying to build more reps with the calisthenics upper body exercises can benefit from this workout. If you’re detrained or coming from a training hiatus and are unable to complete solid reps of pull-ups and push-ups, then you might want to start here.
You can also adjust the exercise selection and follow essentially the same guidelines for stronger individuals. For more specialized goals and more challenging workouts, please check out our other programs.
Disclaimer
While calisthenics can also address weaknesses and injuries, it’s often best to consult with your specialist in person before moving forward with training. This doesn’t only hold true for calisthenics but also for other exercise approaches. Injuries and certain conditions are highly individualized and should be treated in person.
Beginner Calisthenics Workout Program
Not all beginners start at the same level. This is why we will share with you three levels to accommodate every beginner skill stage.
Training Protocols
This is how you will follow the program. The guidelines are as follows to train and get started efficiently.
Exercise Intensity and Volume
Exercise selection and volume are already recommended for each level. Choose the most challenging variation where you can hit the minimum range reps and sets.
It’s important to select an exercise that stimulates your muscles enough at the end of your sets. It’s a driving force for growth so you can become stronger.
Focus on form
One thing that you might always hear in calisthenics is the focus on having good form. However, in reality, this practice should be done in weight training and other forms of exercise as well. Following good form allows you to maximize your gains from the exercise while lowering the risks of injuries.
Bear in mind the techniques and cues for each exercise. There is some leniency mentioned for each technique that we’ve mentioned in the exercise descriptions.
You can practice each exercise with a much lower intensity to train your form first. Visualization can also assist in improving your technique while also promoting better strength development.
How to progress in your workout
Aim to first add at least one rep in each set per training session. This can be affected by many factors, such as your skill level, recovery, nutrition, and capacity to progress.
For example, if you’re performing leg-assisted chin-ups, gradually increase your reps per set per week. Once you have achieved the top limit of the rep range (in our case, 12 reps), proceed to the band-assisted chin-ups or decrease the assistance from your legs.
Here’s what you need to gradually increase arranged based on what should be adjusted first:
- Reps
- Sets
Once you have reached the upper limit of the recommended training volume, then you can start playing around with these factors GRADUALLY:
- Intensity through changing exercise progression
- Intensity through weighted variations
- Time under tension through tempo
- Rest periods
- Even higher training volume
- Deeper range of motion
- More challenging training programs
Rest Period
Rest periods are highly underrated.
A common mistake people make is resting too little to finish the workout early. This is problematic for progress, especially if you’re working on strength and muscle building.
Research shows that one of the most popular recommendations of one minute rest per set offers suboptimal strength and muscular gains compared to longer rest periods of 2 – 3 minutes.
Respect your rest period if you want to gain the most from your workout.
Training Frequency
Perform the workout two or three times per week with at least one day of rest in between each session. This frequency is a good balance of working sets and recovery for your muscles.
Here’s what a week of training would look like if you also combine it with a separate leg workout:
Monday – Upper body workout
Tuesday – Lower body workout
Wednesday – Upper body workout
Thursday – Rest or Lower body workout
Friday – Upper body workout
Saturday – Rest
Training Plan
Follow the program for 5 weeks with three sessions per week. Repeat if necessary.
If you have achieved the upper limit of training volume for most exercises, move to the next level.
Beginner Calisthenics Workout Level 1

The level one beginner calisthenics program is for beginners who have never done bodyweight exercises.
As mentioned earlier, while you will benefit from losing weight when starting with calisthenics, you don’t need to lose weight to get started. Calisthenics can be the approach to help you shed unnecessary weight while building muscle.
Assisted Chin-ups: 3 x 8-12 reps

The leg-assisted chin-up is a beginner-friendly pull-up variation that allows you to work towards the main skill, even with limited upper body strength.
Technique:
- Scapula depressed and retracted during pulling
- Chin up grip with the palms facing towards you
- Full body engaged
- Elbows tucked close to the body
- Around shoulder-width grip width
- Pull in a vertical fashion
- Chin over the bar
- Imagine driving your elbows toward your hips
Progression:
- Use minimal assistance from your legs
Incline Push-ups: 3 x 8-12 reps

If you can’t do a single push-up, start your journey here. It’s a perfect intensity for beginners since we’re intentionally pushing less body weight. You can also choose the height you can use to adjust the difficulty of the exercise. The lower you go, the closer you are to a regular push-up and the harder the exercise.
Technique:
- Body stiff like in a plank-like posture
- Chest to your hands at the bottom position
- Shoulders depressed
- Let your scapula retract as you lower
- Hands placed around shoulder-width apart, but experiment with what works for you
- Elbows close to the body
Progression:
- Place your hands at a lower incline
Incline Rows: 3 x 8-12

Beginners can now build their back with body weight. Similar to the incline push-up, find the incline that suits your level to get going. This is a great lower-intensity exercise to develop body awareness and strength.
Technique:
- Focus on leaning backward to place emphasis on your back muscles
- Allow your shoulder blades to stretch at the bottom, then squeeze together at the top
Progression:
- Place your hands at a lower incline
Assisted Dips: 3 x 8-12

Dedicate yourself to assisted dips. The lower difficulty allows us strict technique and higher multiple-rep sets.
Technique:
- Scapula depressed and retracted during pushing
- Full body engaged
- Elbows tucked close to the body
- Around a comfortable shoulder-width grip width
- Lean forward at the shoulders while keeping vertical forearms
Progression:
- Use minimal assistance from your legs
Scapula Rows: 3 x 8-12 reps

Many beginners struggle with this small but important movement. The scapula row trains squeezing and spreading of the shoulder blade. This develops motor control, which is crucial in many pulling movements for stability. By addressing this weak link, pulling exercises will become noticeably easier.
Technique:
- Straight and lock out arms
- Lean backward
- Slow and controlled movement
Progression:
- More horizontal body alignment
Scapula Push-ups: 3 x 8-12 reps

Scapula push-ups help with pushing exercises stability. Isolating the shoulder blades with locked arms can be tricky. It’s normal to feel awkward at first. Don’t be discouraged. You will improve through practice.
Technique:
- Straight and lock out arms
- High plank body position
- Slow and controlled movement
Progression:
- Use a resistance band appropriate to your level
- From knee to full push-up position
Front Plank: 3 x 30-45 secs

The elbow plank is a priority for beginners. This improves core strength and spine stability, which translates to stronger calisthenics exercises and everyday movements. The goal is to prevent the body from losing horizontal alignment.
Technique:
- Horizontal body line
- Push tall with your depressed shoulders
- Full body tension
Progression:
- Extend the body away from the forearms
Beginner Calisthenics Workout Level 2

This workout is for beginners who can barely rep out upper-body calisthenics. Take note that you’ll need to take advantage of resistance bands to bridge the gap between the unassisted calisthenics fundamentals (mainly dips and pull-ups).
You can check out a good set of bands here: RUBBERBANBDITZ
Band Chin-ups: 3 x 6-10 reps

Band chin-ups are a beginner’s best bet: you’re building a full range of strength at an appropriate level of assistance. Avoid cheating by abusing the assistance from the band too much. Correct band chin-ups include a pause at the bottom and at the top of the end range.
Technique:
- Scapula depressed and retracted during pulling
- Chin up grip with the palms facing towards you
- Full body engaged
- Elbows tucked close to the body
- Around shoulder-width grip width
- Control lowering down
- Pull in a vertical fashion
- Chin over the bar
- Imagine driving your elbows toward your hips
Progression:
- Progress through a thinner band as you get stronger
Floor Push-ups: 3 x 10-20 reps

By this point, you should be able to do incline push-ups as low as 30 cm above the floor OR kneeling push-ups. At this point, this means your upper body is getting stronger, and you’re getting closer to the full push-ups.
Once ready, progress to normal push-ups on the floor. Don’t rush the process by chasing quantity while your technique suffers. You’re better off doing a suitable progression with sound technique.
Technique:
- Body stiff like in a plank
- Chest to your hands at the bottom position
- Shoulders depressed
- Let your scapula retract as you lower
- Hands placed around shoulder-width apart, but experiment with what works for you
- Elbows close to the body
Progression:
- Place your hands at a lower incline or go to the full push-ups
Horizontal Rows: 3 x 10-20 reps

Horizontal rows should be embraced by beginners. You’re now pulling more body weight against gravity because of the horizontal bodyline. Expect more difficulty, especially at the peak range of motion. Grinding at rows will show a noticeable impact on your pull-up performance.
This exercise can be performed on gymnastics rings, a straight bar, or even a TRX system. Use what’s available to you. However, I recommend the rings for convenience and adjustability.
Technique:
- Pull high towards your chest
- Shoulder depression and scapula retraction
- Squeeze your back muscles
- Slow and controlled tempo
Progression:
- Place your hands at a lower incline
- Legs bent or place your feet at an elevated surface with straight legs for more challenge
Band dips: 3 x 6-10 reps

The next exercise is a game-changer for beginners. For those who struggle with bodyweight dips, assistance is the answer. Like banded pull-ups, this variation allows you to perform the exercise in a full range of motion with the correct technique and appropriate intensity for your level.
Technique:
- Proud chest and retracted scapula
- Depressed shoulders
- Elbows tucked close to the body
- Find a grip comfortable for you (around shoulder-width)
- Descent with control until elbows form a 90-degree angle
- Brief pause at the bottom position
- Explosive push to the top
Progression:
- Use a thinner band for less assistance
Scapula pulls: 3 x 8-12 reps

Scapula pulls will serve you well. Training this tiny shrugging movement will transform your pull-up. You should feel the muscles behind your shoulders and back working. This is basically the start of a pull-up from a dead hang start.
Small range of motion exercises should be done slowly. Training the movement by visualizing the muscles will help engage the muscles better.
Technique:
- Proud chest with straight arms
- Slow and controlled movement
Progression:
- Add weights
Scapula Dips: 3 x 8-12 reps

This exercise is underrated. Elevating and depressing our body builds strong shoulders. By isolating this movement, our shoulders come into correct alignment automatically during dips.
Straight-arm scapula strength is a key attribute you develop with this exercise that also translates to many calisthenics movements. After performing scapula dips, our dips will become much stronger, and shoulder pain will become less likely a problem.
Technique:
- Straight lockout arms
- Slow and controlled movement
Progression:
- Add weights
Plank Rollout: 3 x 8-12 reps
Plank rollout adds movement to our plank posture. This challenges our core while maintaining a rigid hollow body position.
We have three options for you. Choose the one you like, but they do the same thing: strengthen your core.
Plank rollout

We don’t need anything to train our core. The exercise is similar to the pattern of an ab wheel rollout with the advantage of not needing any equipment.
Towel rollout

Towel rollouts on a smooth surface are fantastic. We get to build stronger abs while cleaning, too!
Chair rollout

This variation is comfortable thanks to the shoulder-width grip. Chair rollout is an excellent alternative to the ab wheel rollout as well.
Technique:
- Posterior pelvic tilt
- Straight bodyline, so avoid piking at the hips
- Core contracted and trunk still
Progression:
- Start on your knees, then progress to extended legs
- Extended range of motion
- Add pauses at the end range
- Slower movement
Beginner Calisthenics Workout Level 3

The level 3 workout focuses on bridging the gap towards the full range of motion of calisthenics basics. Mastery of this level will make the fundamentals much easier.
Chin-up Eccentrics: 3 x 3-6 reps

Chin-up eccentrics are a plateau-buster. In the world of calisthenics, negatives are a popular and effective way to get stronger. Once you get proficient with this, prepare yourself for the full pull-ups.
Expect a tendency to get sore the next day after training with eccentrics, especially if this is your first time working on the movement. Don’t worry. Just get in your proper nutrition and recovery, then you should be good to go for your next session.
Having a relatively low bar is excellent since you don’t need to jump anymore to reset to reach the top position of the pull-up.
Technique:
- Smooth movement lowering down
- Each rep should last around 5 seconds
- Resist the urge to drop quickly
Progression:
- Gradually add weights
Deep Push-ups: 3 x 8-15 reps

Deep push-ups are much more difficult because of the extra range of motion. This provides a deep stretch for our pecs, shoulders, and triceps that stimulates growth.
Training at longer muscle lengths is superior for getting stronger and growing bigger muscles. Become a master at deep push-ups to unlock new potential for advanced calisthenics exercises.
Technique:
- Regular push-up protocols
- Lower down to your capable strength and mobility
Progression:
- Deeper range of motion
- Add weights
Single-arm Rows: 2 x 8-15 reps

Refine your pulling mechanics one arm at a time. With single-arm rows, you get to improve any imbalances on your arms. We can focus our mental and physical energy on one side at a time. Our core can also build strength since we have to resist trunk rotation.
You can perform this exercise on a bar, but rings offer more benefits. It’s friendlier on your joints and convenient for scalability.
Technique:
- Hips squared
- Shoulders depressed and scapula retracted
- Elbow tucked close to the body
- Full body tension
Progression:
- Lower the hand position to get into a more vertical body position
Dip Eccentrics: 3 x 3-6 reps

Building strength in reverse is the emphasis of eccentrics. This method is perfect for beginners since we’re around 120% stronger in lowering than lifting. We’re stressing our body to adapt and improve by doing back-to-back reps.
Enjoy the love-hate relationship with negatives. They suck, but they are worth your time.
Technique:
- Use a consistent tempo when lowering
- Retracted scapula and depressed shoulders
- Comfortable grip width
- Full body tension
- Proud chest position
- Elbows close to the body
Progression:
- Add weights
Pike Handstand: 3 x 30-45 secs

Do you want to learn handstands someday? A Pike handstand is the best option for beginners to start their handstand journey. This exercise builds overhead strength, endurance, and mobility.
It’s also easy to overcome the fear of inversion or toppling over when starting in this safe manner.
Technique:
- Shrugged shoulders towards your ears
- Hips, shoulders, and wrists stacked vertically
- Experiment with the height of your feet that works for you
Progression:
- Hold for time
Knee Raises: 3 x 10-20 reps

Improve your abs through knee raises. We want the movement coming from our muscles and not through momentum by swinging mindlessly.
The bent-leg variation is perfect for beginners. Cheating the technique is less likely to happen, so we can develop basic strength much faster.
The beauty of knee raises is that we’re developing our abs and hip flexors while also building scapular strength because of the straight-arm component in the supported dip position. And as you’ve noticed in this post, scapular strength is crucial for calisthenics and general shoulder health.
Alternatively, you can perform this exercise in a dead hang to improve your grip strength and endurance.
Technique:
- Drive the knee towards your chest for a full range of motion
- Controlled movement
- Straight arms
Progression:
- Add weights
- Extended legs for added intensity and mobility component
Conclusion
You can watch the summary of this post in this video:
Your goal is to complete workouts 1 to 3 as a calisthenics beginner. After graduation, doing bodyweight exercises is going to be a breeze.
No matter where you start, there’s always a calisthenics workout that can suit your goals and skill level. Take pride that you have the potential to change if you keep working.
If you need a comprehensive workout for beginners, then we have something especially for you. Get started with calisthenics correctly with complete guidance with Begin Bodyweight Program by FitnessFAQs.

